lib: Implementation of the API to subscribe to the newsletter
test: Tests definition and configuration
There is more.
Every week I build a new open source project, with a new language or library, and teach you how I did it, what I learned, and how you can do the same. Join me and other 600+ readers.
Starting point: Services in Effect
The first step in all Effect projects is defining a Service.
A Service in Effect is a Typescript interface defining the API of the application.
Our application has only one method addSubscriber that allows to subscribe an email to ConvertKit:
ConvertKit.ts
import { Effect } from "effect";export interface ConvertKitService { /** * Add new subscriber with given `email`. */ readonly addSubscriber: ( email: string ) => Effect.Effect<never, never, string>;}
addSubscriber returns an Effect type. Effect.Effect<never, never, string> has 3 type parameters:
Requirements (never)
Errors (never)
Return value (string)
We are going to define these 3 types more specifically later on, for now we can leave the definition as Effect.Effect<never, never, string>
Context for a Service
Every service in Effect is assigned a tag using Context.
A Tag serves as a representation of the ConvertKitService service. It allows Effect to locate and use this service at runtime:
ConvertKit.ts
import { Context, Effect } from "effect";export interface ConvertKitService { /** * Add new subscriber with given `email`. */ readonly addSubscriber: ( email: string ) => Effect.Effect<never, never, string>;}export const ConvertKitService = Context.Tag("@app/ConvertKitService");
Note: We did not define yet a concrete implementation of the service. This is intentional. A service is just the definition of the API, we are going to implement it below using Layer
Config: Environmental variables
A request to the ConvertKit API requires 3 configuration values:
Tip: Check out QuickType to convert a JSON definition to its corresponding Schema
The request also requires 2 parameters in the body:
api_key
email
We define these parameters using Schema as well:
Schema.ts
import * as Schema from "@effect/schema/Schema";export const SubscribeRequest = Schema.struct({ api_key: Schema.string, email: Schema.string,});
Request implementation: Layer and HttpClient
We are now ready to define the concrete implementation of ConvertKitService using Layer.
Layers are a way of separating implementation details from the service itself.
Layers act as constructors for creating the service.
We use Layer.succeed since ConvertKitService is a simple service without any dependencies.
Layer.succeed requires the service Context as first parameter and a concrete implementation of the service as second parameter (created using ConvertKitService.of):
The first step is collecting the configuration parameters defined previously using Config. We use Effect.config to extract a valid instance of ConvertKitConfig:
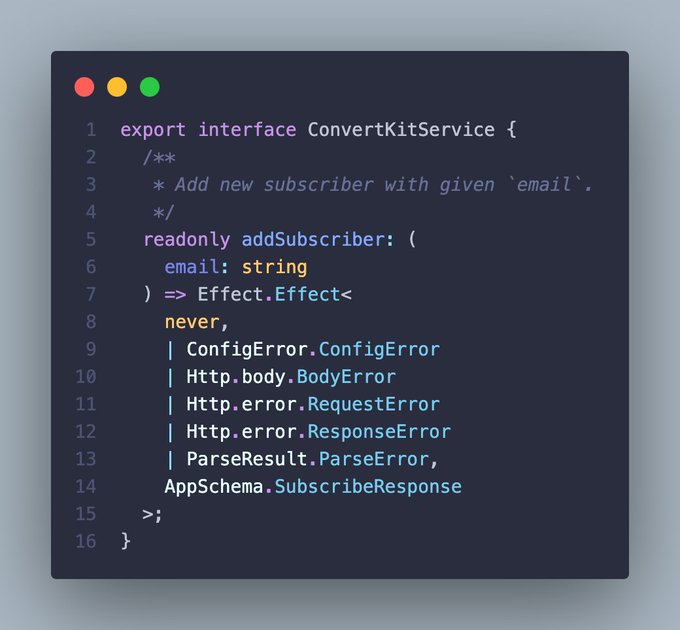
The Type Definition is all you need 🪄
This interface tells you everything you need to know about the API using the Effect type
💁🏼♂️ No dependencies
⛔️ List all the possible errors
✅ Returns a SubscribeResponse
Type safe, easy to read and maintain 🚀
Sandro Maglione
@SandroMaglione
Weekly project: @ConvertKit + @nextjs + @EffectTS_
Implement your custom newsletter form using NextJs, the ConvertKit API, and Effect
Interested? I will share all open source and on my newsletter 👇
sandromaglione.com/newsletter?ref…
Every week I build a new open source project, with a new language or library, and teach you how I did it, what I learned, and how you can do the same. Join me and other 600+ readers.
API route handler
We are going to use ConvertKitService inside a nextjs API route.
A route provides a Request. We now need to validate the request and extract the email sent in the body.
We create a new main function that returns an Response inside Effect:
Server.ts
export const main = (request: Request): Effect.Effect<never, never, Response> =>
  Effect.gen(function* (_) {
    // TODO
  });
The first step is extracting the body from the POST request. We define a new error for this operation using Data.TaggedError:
This code does not work yet. We need to handle all errors and provide all the dependencies to satisfy the return type Effect.Effect<never, never, Response>.
main has a dependency on ConvertKitService. Therefore we use Effect.provide to pass a valid instance of ConvertKitService:
That's all! Now we can use and run this Effect using runPromise inside the API route:
app/api/subscribe/route.ts
import { main } from "@/lib/Server";import { Effect } from "effect";export async function POST(request: Request): Promise<Response> { return main(request).pipe(Effect.runPromise);}
Perform request on the client
The very last step is to implement the component to send the request to the API.
Before doing that we need to create a new Effect. The user provides an email (string) and the Effect is responsible to make the API request:
Client.ts
export const main = (email: string) =>
  Effect.gen(function* (_) {
    // TODO
  });
The implementation is similar to before:
Config to collect the endpoint of the API
HttpClient to define the request, passing the email in the body
Http.client.fetch() to perform the request
Client.ts
import * as AppSchema from "@/lib/Schema";import * as Http from "@effect/platform/HttpClient";export const main = (email: string) => Effect.gen(function* (_) { const apiUrl = yield* _(Effect.config(Config.string("SUBSCRIBE_API"))); const req = yield* _( Http.request.post(apiUrl), Http.request.acceptJson, Http.request.schemaBody(AppSchema.RouteRequest)({ email }) ); return yield* _( req, Http.client.fetch(), Effect.flatMap(Http.response.schemaBodyJson(AppSchema.SubscribeResponse)) ); });
page component
We can then call main inside a react component, passing the email provided by the user:
Inside Config we specify the ConvertKit form id (CONVERTKIT_FORM_ID).
Every subscriber on ConvertKit is linked to a form. A form id is therefore required to subscribe a new email.
You need to create a form inside the "Landing Pages & Forms" section:
Create a form to subscribe a new user in your ConvertKit account
Create and open the page to edit the form, then click on the "Publish" button. You can find the id of the form you just created inside the popup:
You can find the form id inside the "Publish" popup
This is it!
Open the page, add your email, and sign up! All powered by ConvertKit and Effect!
How do we make sure it all works as expected? Testing!
Turns out testing becomes easy and natural when using Effect. We can inject custom Config values for testing and we can use Mock Service Worker to mock HTTP requests.
If you are interested to learn more, every week I publish a new open source project and share notes and lessons learned in my newsletter. You can subscribe here below 👇
Every week I build a new open source project, with a new language or library, and teach you how I did it, what I learned, and how you can do the same. Join me and other 600+ readers.